Showing posts with label Food In Jars. Show all posts
Wednesday, February 6, 2019
Lime Curd
After discovering how amazing Meyer Lemon Curd was, I decided that I would do a third challenge for January. I made lime curd and it did not disappoint! It is just like a key lime pie in a jar. I used the recipe in Marisa's book (shown in the picture above) but there is not a link to it on her blog. This recipe seems very similar but does not include the canning information. The curd can be canned in a hot water bath by processing it for at least 25 minutes and is shelf stable for 2 months. That said, at 2 months it begins to separate but is still fine to eat. Freezing your jars is the best method for long term preservation.
Labels:
#fijchallenge,
curd,
Food In Jars,
Food in Jars Challenge,
freezing,
lime curd,
limes
Clementine Marmalade
Any left overs that don't fit in the canner, can go straight into the fridge. There's my left overs tucked in between a lemon curd and a Nana Tito's marmalade. Enjoy!
Meyer Lemon Curd
This curd is a lemon meringue pie in a jar. I chose the recipe from Marisa McClellan's book Food In Jars but a similar recipe can be found on her blog. Here is her blog post is for Meyer Lemon Curd.
I highly recommend trying your hand at making a curd, it is not as scary as it seems, and the only special equipment you need is a thermometer (preferably a candy thermometer) and a double boiler which can be easily made with a stock pot and a large bowl. Here is how I made mine:
I processed mine in hot jars for 25 minutes in a hot water bath. It is shelf stable once canned for two months, so for long term storage it is best to keep it in the freezer. Any left overs that don't fit in the hot water bath can go in a jar for the fridge. Here is my left overs placed next to my clementine marmalade (recipe coming next) and our neighbor Anne's marmalade (in the fancy jar!) Enjoy!
I highly recommend trying your hand at making a curd, it is not as scary as it seems, and the only special equipment you need is a thermometer (preferably a candy thermometer) and a double boiler which can be easily made with a stock pot and a large bowl. Here is how I made mine:
I processed mine in hot jars for 25 minutes in a hot water bath. It is shelf stable once canned for two months, so for long term storage it is best to keep it in the freezer. Any left overs that don't fit in the hot water bath can go in a jar for the fridge. Here is my left overs placed next to my clementine marmalade (recipe coming next) and our neighbor Anne's marmalade (in the fancy jar!) Enjoy!
Monday, June 5, 2017
Violet Jam
![]() |
| A boy in the grass picking flowers |
Then I remembered that we had violets growing at the edge of the woods. FLOWERS .... I could challenge myself by using flowers. It was a wonderful Sunday morning activity. With the help of Baby, we went foraging in the field for violets.

It was an ideal Sunday morning, drinking my tea, sitting in the shady grass with my youngest picking flowers.
I need to be honest here though one cup of packed violets is a hard earned venture, even Baby bagged out before I got them all. They almost camouflage themselves among the grass - you can only see them when you look at them from the right direction.
![]() | |
| I love the swirl in the leaves. |
All in all, it took over an hour to procure one cup of violets but luckily that is all I needed because I picked every last one of them.
I used a recipe from Soule Mama found HERE.
I don't know if I did it right or used the right amount of pectin because my jam isn't as purple as hers. It also seems to have a grainy consistency. I would definitely make this again, but I might use natural pectin from apples. This was a nice experiment in foraging and I will tinker with it again. How many rounds of blooms do violets have in a season?
![]() |
| I Tweezed out any impurities |
Ingredients
1 (packed) cup violet blossoms
1 cup water
juice of one lemon
1/2 cup honey
pectin (I used 1/3 of a box of Pomona pectin - turns out that 1/3 is 1 Tablespoon and 1 Teaspoon.)
1 cup water
juice of one lemon
1/2 cup honey
pectin (I used 1/3 of a box of Pomona pectin - turns out that 1/3 is 1 Tablespoon and 1 Teaspoon.)
Process
1. Spend a lovely late spring morning with your youngest child foraging for violets.
2. Blend violets, 1/2 of the water and lemon juice.
3. Heat remaining water and honey in a saucepan.
4. When warm, add pectin and stir until mixed
well.
5. Add pectin/honey mix to blender. Blend again until smooth.
6. Place
in hot jars immediately to set. This is a freezer jam for preserving.
Labels:
flowers,
Food In Jars,
Food in Jars Challenge,
foraging,
freezer,
freezer jam,
jam,
Soule Mama,
violets
Tuesday, March 7, 2017
Jellies and Shrubs for the March Food in Jars Challenge
Here is the post for Marisa's March Food in Jars Challenge which will focus on Jellies and Shrubs. In the lead up to this I was brainstorming all the shrubs I could think of to make jellies out of. I questioned the validity of this, asking what discerns a shrub from an invasive from a weed or a plant? Clearly I was WAY OFF BASE. I'm still so curious what I will make, but I have two good mixologists in my life to inspire me and some wonderful tried and true recipes to fall back on. Thank you again for the Challenge Marissa! To quote Marissa from the March Challenge post, "a shrub is a combination of fruit, sugar and vinegar. When left to sit for a
few days (or even longer), they develop a deep, sweet-tart flavor
that is a wonderful addition to a glass of sparkling water, a batch of
salad dressing, a fancy homemade cocktail, a marinade for meat or
vegetables, or to a pan sauce
There is better writer on the topic of shrubs than Michael Dietsch. He started in on the topic back in 2011 with this post on Serious Eats and has subsequently written a whole book about them. Emily Han‘s book, Wild Drinks and Cocktails, is also contains a lot of tasty shrubs.
If you remember the essential ratio of one part sugar, one part vinegar, and a generous handful of fruit of some kind, you’ll be good."
There is better writer on the topic of shrubs than Michael Dietsch. He started in on the topic back in 2011 with this post on Serious Eats and has subsequently written a whole book about them. Emily Han‘s book, Wild Drinks and Cocktails, is also contains a lot of tasty shrubs.
If you remember the essential ratio of one part sugar, one part vinegar, and a generous handful of fruit of some kind, you’ll be good."
Labels:
Food In Jars,
Food in Jars Challenge,
jelly,
Marisa,
shrubs
Saturday, February 25, 2017
Salt Preserving, the February Food in Jars Challenge!
This month's food in jars challenge was a simple and exciting delight! I must admit that this terrified me at first. I slowly warmed up to it and got really excited. When I finally got going - I got three challenges - four recipes - done in under two hours!
The first recipe I made was Salt Preserved Egg Yolks. Having a flock of our own free range chickens this seemed a wonderful opportunity to take our homemade pasta nights to a new level. I used the recipe from Hunter Angler Gardener Cook found here: http://honest-food.net/salt-cured-egg-yolks/. I chose to use 6 eggs because it fits nicely in a muffin pan. I will update the blog with a new post when they come out of hiding on 2/31.
The process is easy. You separate the eggs. You line what ever container you are using with a half inch of salt (I used sea salt but you can use Kosher as well) and create a divot that you will place your yolk in. Once they are all in, bury them in salt, put them in the refrigerator, and wait one week.
The second recipe I made was Salt Preserved Lemons. I more or less followed the recipe on Food in Jars found here: http://foodinjars.com/2011/02/preserving-lemons/ but being a very visual person, I perused the web for recipes that had more pictures as well. This was another very straight forward process.
Step one, thouroughly wash and scrub your lemons. I wanted to scrub harder since mine seemed rather waxy but didn't want to upset the zest.
Step 2, you cut the nubs off either end of the lemons and then quarter them ALMOST all the way but keep them intact. I did make the mistake of cutting a few all the way apart, but just continued.
Put a good layer of salt on the bottom of your jar and then, holding the lemon over the jar, spread roughly a teaspoon of salt into all the cracks and then pack it into the jar.
Add salt after each layer of lemon. Feel free to use pressure to get them in there because the point is to draw out the juices from the fruit. I used 10 lemons and packed them into Quart Mason jars, about 5 lemons in each.
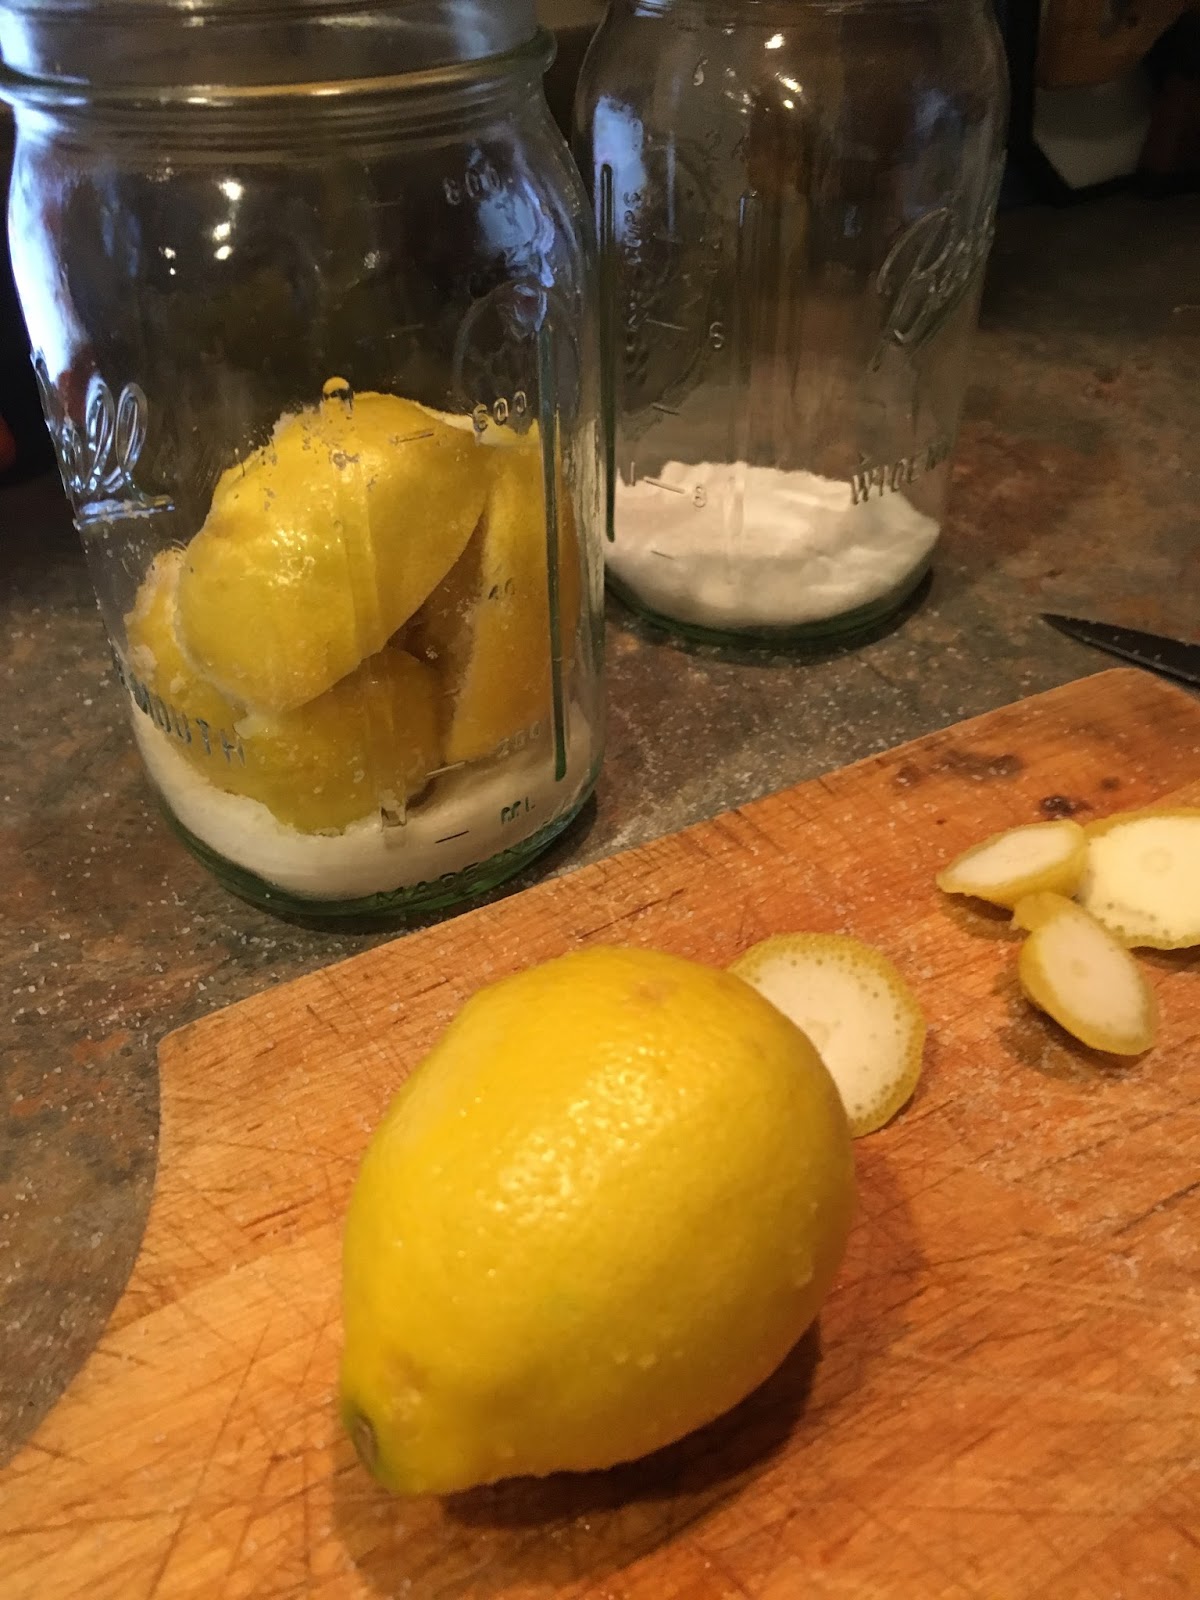
The jars sit out on the counter for 3 days before moving into the fridge. The goal is to have them covered in juices by the end. Here is my jars after two days.
I am a little concerned about the salt leaking out of it and the lids not being airtight as a result, but I do not want to go to metal lids and bands because of the corrosion the salt will cause. We will have to see in a day or so. I am HOPING that i can fit them all in one jar before they go in the back of the fridge for three weeks. We will see and I will update with a new post.
The last recipe I made was two herb salts. I thought this was a wonderful way to make rubs for meat and to help stretch those herbs out even longer - whether it is store bought or garden grown - herbs so quickly wilt and rot. I used the following links for encouragement, A Raisin and a Porpoise and The Prairie Homestead. This was very straight forward : combine 1/2 cup salt and your bunch of de-stemmed herbs in a food processor.
This is my cilantro and then rosemary salts laid out after being processed.
Lay it out on parchment paper or on a dehydrator shelf, and dehydrate until all the moisture is removed. I used the oven since I don't own a good dehydrator yet (I killed my old one trying to dry out left over tempura fry). I set my oven to 200 degrees and left it in for about 1/2 an hour then I turned the oven off and left it in. (truth be told I had to go out).
The next morning they were thoroughly dried and shelf stable so I jarred and labeled it.
I look forward to using there on some pork tenderloin or even smoked Trout this spring. Yum! I can't wait to see what the March Challenge will bring - jellies and "shrubs"? Hmm it has me thinking.
The first recipe I made was Salt Preserved Egg Yolks. Having a flock of our own free range chickens this seemed a wonderful opportunity to take our homemade pasta nights to a new level. I used the recipe from Hunter Angler Gardener Cook found here: http://honest-food.net/salt-cured-egg-yolks/. I chose to use 6 eggs because it fits nicely in a muffin pan. I will update the blog with a new post when they come out of hiding on 2/31.
The process is easy. You separate the eggs. You line what ever container you are using with a half inch of salt (I used sea salt but you can use Kosher as well) and create a divot that you will place your yolk in. Once they are all in, bury them in salt, put them in the refrigerator, and wait one week.
The second recipe I made was Salt Preserved Lemons. I more or less followed the recipe on Food in Jars found here: http://foodinjars.com/2011/02/preserving-lemons/ but being a very visual person, I perused the web for recipes that had more pictures as well. This was another very straight forward process.
Step one, thouroughly wash and scrub your lemons. I wanted to scrub harder since mine seemed rather waxy but didn't want to upset the zest.
Step 2, you cut the nubs off either end of the lemons and then quarter them ALMOST all the way but keep them intact. I did make the mistake of cutting a few all the way apart, but just continued.
Put a good layer of salt on the bottom of your jar and then, holding the lemon over the jar, spread roughly a teaspoon of salt into all the cracks and then pack it into the jar.
Add salt after each layer of lemon. Feel free to use pressure to get them in there because the point is to draw out the juices from the fruit. I used 10 lemons and packed them into Quart Mason jars, about 5 lemons in each.
The jars sit out on the counter for 3 days before moving into the fridge. The goal is to have them covered in juices by the end. Here is my jars after two days.
I am a little concerned about the salt leaking out of it and the lids not being airtight as a result, but I do not want to go to metal lids and bands because of the corrosion the salt will cause. We will have to see in a day or so. I am HOPING that i can fit them all in one jar before they go in the back of the fridge for three weeks. We will see and I will update with a new post.
The last recipe I made was two herb salts. I thought this was a wonderful way to make rubs for meat and to help stretch those herbs out even longer - whether it is store bought or garden grown - herbs so quickly wilt and rot. I used the following links for encouragement, A Raisin and a Porpoise and The Prairie Homestead. This was very straight forward : combine 1/2 cup salt and your bunch of de-stemmed herbs in a food processor.
This is my cilantro and then rosemary salts laid out after being processed.
Lay it out on parchment paper or on a dehydrator shelf, and dehydrate until all the moisture is removed. I used the oven since I don't own a good dehydrator yet (I killed my old one trying to dry out left over tempura fry). I set my oven to 200 degrees and left it in for about 1/2 an hour then I turned the oven off and left it in. (truth be told I had to go out).
The next morning they were thoroughly dried and shelf stable so I jarred and labeled it.
I look forward to using there on some pork tenderloin or even smoked Trout this spring. Yum! I can't wait to see what the March Challenge will bring - jellies and "shrubs"? Hmm it has me thinking.
Monday, January 9, 2017
I made Marmalade! Food in Jars Mastery Challenge for 2017
Yesterday I completed my first challenge for the Food in Jars Mastery Challenge for 2017, a monthly skill based challenge for people interested in expanding our knowledge and skills in canning and preserving foods.
Here is the calendar for the 2017 Challenge:
Calendar of Preserving Skills
January – Marmalade
February – Salt Preserving
March – Jelly
April – Quick Pickles
May – Cold Pack Preserving
June – Jam
July – Hot Pack Preserving
August – Low Temperature Pasteurization
September – Fruit Butter
October – Drying and Dehydration OR Pressure Canning
November – Fermentation
December – Fruit Pastes
I had never made Marmalade before yesterday and while it was a lot of work I can say I am a new fan! Looking at the calendar I can say that February's challenge with salt preserving slightly terrifies me, cold and hot pack preserving I have never heard of, I'm fascinated to learn what low temperature pasteurization is, and I will definitely need some tools and supplies for fermentation. Needless to say, I am stoked about opportunities that this Challenge will create.
Yesterday was a long day in the kitchen as Marmalade takes more work than other recipes for sure!

I thought about how much ginger I needed to peel and realized this could be a long day.
I sat at the counter and got to work, minus about a bazillion kid interruptions. Seriously, no sooner did I send them to the sled hill and set out my mis en place when they were back and asking for food!
Here is the calendar for the 2017 Challenge:
Calendar of Preserving Skills
January – Marmalade
February – Salt Preserving
March – Jelly
April – Quick Pickles
May – Cold Pack Preserving
June – Jam
July – Hot Pack Preserving
August – Low Temperature Pasteurization
September – Fruit Butter
October – Drying and Dehydration OR Pressure Canning
November – Fermentation
December – Fruit Pastes
I had never made Marmalade before yesterday and while it was a lot of work I can say I am a new fan! Looking at the calendar I can say that February's challenge with salt preserving slightly terrifies me, cold and hot pack preserving I have never heard of, I'm fascinated to learn what low temperature pasteurization is, and I will definitely need some tools and supplies for fermentation. Needless to say, I am stoked about opportunities that this Challenge will create.
I
should start by saying that I found so much serendipity in the
facts that a) My husband brought home Cara Cara oranges from snow making
without knowing that I had a Marmalade challenge and b) Of all my
canning books with Marmalade recipes, only Marisa's book Food in Jars (of the #fijchallenge) had a Cara Cara recipe.
Yesterday was a long day in the kitchen as Marmalade takes more work than other recipes for sure!

I thought about how much ginger I needed to peel and realized this could be a long day.
I sat at the counter and got to work, minus about a bazillion kid interruptions. Seriously, no sooner did I send them to the sled hill and set out my mis en place when they were back and asking for food!
Ginger Juice was a first for me!
This is my 'scant' one cup ginger juice!
After that I needed to zest my ten oranges.
That's a lot of zest and my hands were tired!
Then I needed to peel and Supreme my oranges.
While I did that I needed to cook my confetti zest and reserve the water.
And then it all stated to come together and cook. Look at those beautiful colors!
I couldn't find my candy thermometers anywhere so I had to use a meat thermometer. I asked SP after the fact and he told me that one broke in the drawer and then he broke on making maple syrup. Well if you can see the thermometer well enough, it is well over 220. I also used the saucer test on it and it passed, or so I thought, on the second test. However, my marmalade never really set.
I am more than pleased to have my first Christmas 2017 gift put up on January 8th - another first!
Thank you Marisa!
Subscribe to:
Posts (Atom)